Income HUD Verifications - Using the Magnifying Glass Icon
The Magnifying Glass icon can be used to review the entire HUD Verification response history for health insurance, income, non-cash benefits, and disabilities (for those projects required to gather disability information). This icon is highly useful for reviewing previously entered information to identify and correct data entry errors, and it can also be used as an alternative means of updating HUD Verifications (see the Recording Updates to HUD Verifications article for details about the primary method of updating HUD Verifications covered in your HMIS training).
While the information in this article will be specific to Income HUD Verifications, please note that the principles for reviewing, correcting, and updating information using this icon are the same for the Health Insurance, Non-Cash Benefits, and Disability HUD Verifications. In addition, the information outlined below is explained and demonstrated in more detail in this video (email Help Desk for password).
Table of Contents
- Accessing and Reading the View All Records Table
- Updating Records from the View All Records Table
- Using the View All Records Table to Make Corrections
Accessing and Reading the View All Records Table
- Navigate to the Assessments tab (if applicable) or navigate to the client's Project Entry, Interim Update, or Project Exit and scroll down to the section for Income. Now click on the Magnifying Glass icon to view all records for that HUD Verification sub-assessment.

- Now click on the blue "Source of Income" column header to sort records alphabetically.
- Review the information in each column.

Each row provides us with information about a single source of income, including the EDA Provider and Back Date that were set, whether or not the income was being received, the amount of income received on a monthly basis (if applicable), the day the information about that income source was reported, and the last day that the information about that income source was valid.
Taken together, this data tells us a story about the client's situation. For example, looking at the data above, we see that this particular individual was earning $1,200 per month in Earned Income between 6/10/2020 and 9/20/2020. The client then reported an increase in Earned Income to $1,800 per month between 9/21/2020 and 6/14/2021, and then another increase in Earned Income to $2,200 per month starting on 6/15/2021.


Updating Records from the View All Records Table
Remember that correctly updating HUD Verifications will always involve a two-part process that includes, 1.) adding an End Date to the old record for the day before the new record goes into effect, and 2.) creating a new record that reflects the most recent information. With that in mind, use the following steps to guide you through using the Magnifying Glass icon to record changes in HUD Verifications for Income.
Consider the following example: a client reports that they were not receiving Child Support when they initially presented to a project on 6/10/2020, but they later report on 6/15/21 that they are now receiving $250 per month in Child Support. To correctly update this record, we would 1.) add an End Date to the old Child Support record for 6/14/21 and 2.) create a new record showing that the client is receiving $250 in Child Support starting on 6/15/21.
- To record the change in income from the example above, you would start by clicking on the Magnifying Glass icon to view all records for the Income HUD Verification sub-assessment, and then you would use the blue "Source of Income" column header to sort records alphabetically. Then you would click on the Pencil icon to the left of the old Child Support record, and you would enter an End Date for the old record of 6/14/21 (do not change any other part of the record).

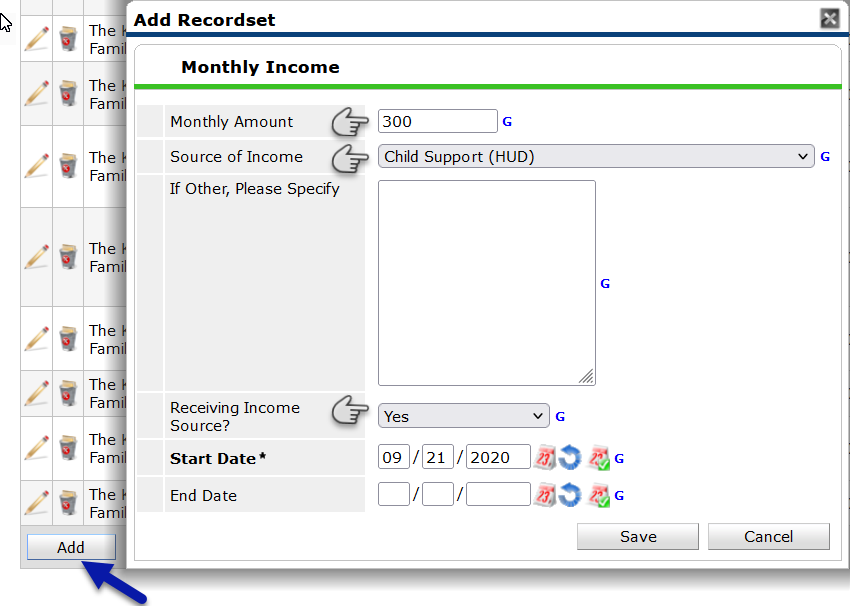
- Now that you have added an End Date to the old record, it is time to create a new record to reflect the most current information. Scroll to the bottom of the View All Records table, and click the "Add" button. Now fill in the Monthly Amount, Source of Income, and the information about whether the client is Receiving Income Source.

- Now that you have completed the two-part process for updating a HUD Verification, review your work to ensure that the story the data tells matches the experience of the client. The data should show that the client was not receiving income from Child Support between 6/10/20 and 6/14/21, but that they later began receiving $250 per month in Child Support beginning on 6/15/21.


Using the View All Records Table to Make Corrections
Regardless of whether you choose to record changes in a client's income using the Magnifying Glass icon or using the traditional HUD Verification Link method covered in your initial training, it is an excellent idea to use the Magnifying Glass icon to review the HUD Verification sub-assessments for your client to ensure that the data you have entered is correct and to ensure that there are no errors in any of the client's previously recorded information. There are a few essential things you should check when reviewing the record history for a HUD Verification sub-assessment. A correctly recorded HUD Verification sub-assessment will meet the following criteria:
There is one and only one record open for each Source of Income.
- If there are multiple open entries for a particular Source of Income, you will add End Dates to the old records as needed.
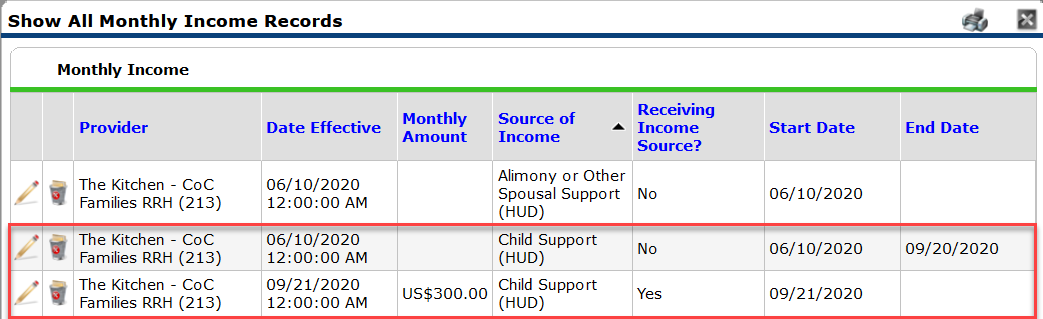
 In this example, there are two open Source of Income records for "Child Support." To correct this issue, select the pencil icon to the left of the previous record (highlighted in red above) to add an End Date to the old record for the day before the new record went into effect.

The records for each Source of Income do not overlap.
- The End Date for a previous record will always be set for the day before the new record goes into effect. Modify End Dates as needed.

In this example, the End Date for the old Earned Income record overlaps with the Start Date for the new Earned Income record, which will lead to inaccurate calculations of the client's total income in HMIS. To correct this issue, select the pencil icon to the left of the previous record to replace the End Date with an End Date that is one day before the new record went into effect.
There are no discrepancies in the information recorded.
- If "Receiving Income Source?" is set to "No", then there should be no dollar amount listed under "Monthly Amount."
 In this example, the $1,200 Monthly Amount listed for the Earned Income record contradicts the "No" response recorded for Receiving Income Source. The proper way to correct this issue will depend on whether or not the client was actually receiving that income at the time. If they were receiving the income, select the pencil icon to the left of the record and set Receiving Income Source to "Yes".

 If they were not receiving the income, select the pencil icon to the left of the record and delete the $1,200 recorded under Monthly Amount.
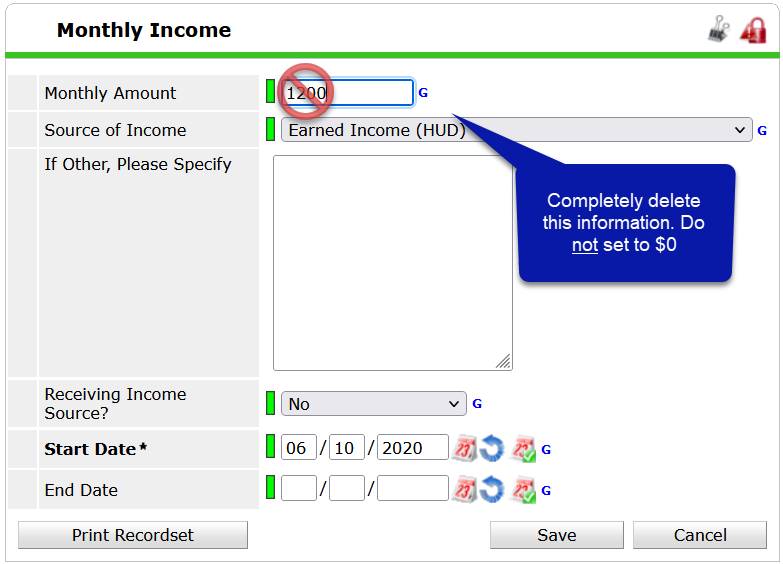
There is no missing information in the record.
- All Sources of Income should have a record indicating whether the client is currently receiving that Income Source
- If Receiving Income Source? is set to "Yes", then there should be a dollar amount listed under Monthly Amount.
- If a record is missing information about Source of Income, Receiving Income, or Monthly Amount (only applicable if client is receiving income source), then the missing information either needs to be filled out using the pencil icon, or the incomplete record needs to be deleted using the trash can icon and the correct information needs to be recorded in its place.

The Start Date and the Date Effective match.
- For projects that utilize an Entry/Exit workflow, the Date Effective will always match the Back Date that was set when the Project Entry, Interim Update, or Project Exit was recorded.
- For example, if a client has a Project Entry for 6/10/2020, then any HUD Verification Sub-assessment information entered in that project entry will have a 6/10/2020 Date Effective associated with it. If a client has an Annual Assessment on 6/15/2021, then any HUD Verification Sub-assessment information entered for that Interim Update will have a 6/15/2021 Date Effective associated with it.
Note that the time stamp associated with the Project Entry, Interim Update, or Project Exit will always override any other Back Date that might be set when data is entered into HMIS. If you have your Back Date set to 6/15/2021, but you are editing the Project Entry on 6/10/2020, then Date Effective associated with the data you entered will still be 6/10/2020.
Because of this, it is essential that you correct the errors you find in the HUD Verification Sub-assessments at the point where the error occurred. Data entry errors made at entry must be corrected by editing the Project Entry; data entry errors made during an Update must be corrected by editing that specific Update; and data entry errors made at exit must be corrected by editing the Project Exit.
 In this example, the $1,200 per month Earned Income record (highlighted in green above) has a Start Date of 6/15/2021, but the Date Effective is 6/10/2020. Receiving Income Source.
Similarly, the $800 per month Earned Income record (highlighted in red above) has a Start Date of 6/10/2020, but a Date Effective of 6/15/2021.
If the Start Date and the Date Effective do not match, then that is an indicator that at some point, the client's information was incorrectly updated. Typically, this happens when someone accidentally overwrites previously entered HUD Verification information instead of following the standard two-part process for recording updates to HUD Verification sub-assessments. Detailed instructions have been provided below to assist you in correcting basic errors.
However, if the mistake was made by a different user or involves data from multiple interim updates or project entries, then correcting the errors can be quite complicated, and we recommend that you reach out to the ICA Missouri Helpdesk for assistance.
A Common Mistake - Overwriting Previously Entered Information
During your HMIS training, you are instructed to record updates to HUD Verifications using a two-part process that involves, 1.) adding an End Date to the old record for the day before the new record goes into effect, and 2.) creating a new record that reflects the most recent information. But what happens if you forget to follow the two-part process and accidentally overwrite information already in the system?
For the example below, consider a situation in which a client who previously received no income from child support when they enrolled in the project on 6/10/2020, but who later reported on 9/21/2020 that they were now receiving $300 per month in Child Support. You create an Interim Update on 9/21/2020 to document this change in income, but you forget to add an End Date to the old Child Support record and you write over the existing record with new information.

When you check your work in the View All Records table by clicking on the Magnifying Glass icon for the Income HUD Verification sub-assessment, you would see that the Date Effective and the Start Date do not match. Furthermore, there is no longer a record providing information about whether the client was receiving Child Support during the period between 6/10/2020 (when the other records begin) and 9/20/2020.

To correct this issue:
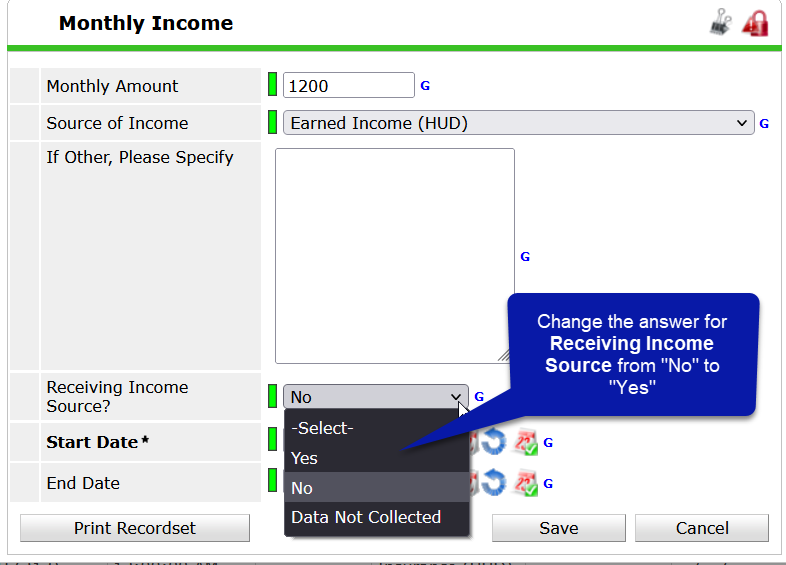
- Use the Pencil icon next to the incorrect record in order to restore the data that was overwritten.
- Now change the Monthly Amount, Receiving Income Source, and Start Date back to the answers in the original record. Use the green or red history bar to see the answer history for each of these specific fields.
- Once the record reflects the previously entered information again,add an End Date to the old record for the day before the new record goes into effect.
- Now that you have added an End Date to the old record, it is time to create a new record to reflect the most current information. Scroll to the bottom of the View All Records table, and click the "Add" button. Now fill in the Monthly Amount, Source of Income, and the information about whether the client is Receiving Income Source.
- Now that you have completed the two-part process for updating a HUD Verification, review your work to ensure it tells the story the data tells matches the experience of the client. The data should show that the client was not receiving income from Child Support between 6/10/20 and 6/14/21, but that they later began receiving $300 per month in Child Support beginning on 9/21/2020.

Correcting these errors can be complicated, so please don't hesitate to contact the ICA Missouri Helpdesk for assistance. When in doubt, reach out!
Copyright 2021 Institute for Community Alliances. All Rights Reserved.